
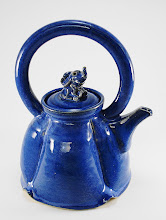
At the rather fab open house Sunday I made a number of pieces, but folks didn’t have a chance to see the finishing process. Once a piece is dried overnight, the pot is turned over, as on number 1, trimmed as the wheel spins for a nice foot ring as on number 2, then signed and set up to finish drying as in number 3. Of course later, glazing and final firing, as in number 4.
Finishing pottery can be simple or complicated. I never trim a piggy bank, just clean the rough area with the knife and sponge, then add eyes, ears, trotters, tail. But with bowls, cups, vases etc you want a clean and even, attractive surface. Sure, it is under the pot, but as they said when I was learning this stuff in college ‘a Japanese master always looks at the bottom of the pot. Did the potter finish the piece as beautifully under as with the upper part?’ and as Jane my instructor always said in a thick Texas accent ‘juuusst make sure the top and the bottom of a pot are perfect, everthang in b’tween takes care a itself’.
Finishing pottery can be simple or complicated. I never trim a piggy bank, just clean the rough area with the knife and sponge, then add eyes, ears, trotters, tail. But with bowls, cups, vases etc you want a clean and even, attractive surface. Sure, it is under the pot, but as they said when I was learning this stuff in college ‘a Japanese master always looks at the bottom of the pot. Did the potter finish the piece as beautifully under as with the upper part?’ and as Jane my instructor always said in a thick Texas accent ‘juuusst make sure the top and the bottom of a pot are perfect, everthang in b’tween takes care a itself’.


No comments:
Post a Comment